


There's pretty much no singular source that teaches people how to create LittleBigPlanet costume mods (outside of discord that is). And i keep seeing people asking how to create them, so i decided to write a quick guide to hopefully ease that whole ordeal
This guide will be VERY long, but this is simply because i'm going over EVERYTHING from zero, anything before "Actually making the accessory" only needs to be done once, and after practicing a bit the rest will pretty much feel "automatic" and quick
Okay, you'll need quite a lot of tools to get this thing going, so here is all of them.
To get started we're gonna need two things, the model sack_boy, and your bigfart. sack_boy is the model for Sackboy, this is the one you'll use for rigging the outfits in. Bigfart is essentially what stores your profile's custom objects, this is where the mod will be installed.
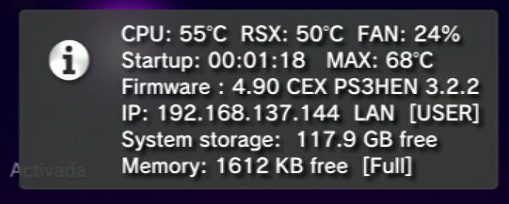
This is the easiest thing to obtain, first, enable HEN if you need, then press select + start. This will
display your IP
After that, we're gonna go to our FTP client of preference, then connect to the IP you just obtained (in my case it's FileZilla)
Now, you're gonna want to go to /dev_hdd0/game/[TITLE_ID]_USER[NUMBER], where TITLE_ID is your game's title ID, and NUMBER the account number. Here's a quick table to help you find the game you need
| Format | LBP1 | LBP2 | LBP3 | |||||||
|---|---|---|---|---|---|---|---|---|---|---|
| US | EU | ASIA | US | EU | ASIA | JP | US | EU | ASIA | |
| Digital | NPUA80472 | NPEA00241 | NPHA80161 or NPHA80163 | NPUA80662 | Digital Edition: NPEA00324 Extras Edition: NPEA00437 |
BCAS20058 or NPHA80163 | NPJA00123 | NPUA81116 | NPEA00515 | NPHA80277 |
| Disc | BCUS98148 GOTY Edition: BCUS98208 |
BCES00141 GOTY Edition: BCES00611 |
BCUS98245 | BCES01086 or BCES00850 Special Edition: BCUS98372 Extras Edition: BCES01693 |
BCAS20113 | BCUS98362 | BCES02068 or BCES01663 |
If you're unable to find the folder here, then don't worry, you can always check the spine of your game's box. it should be at the very bottom
Now, go to the folder and you'll find USRDIR, go inside and you'll see two files, bigfart____ and littlefart____. Download both. We're not going to use littlefart, but it's still worth backing up incase things go south
Now, make a copy of your bigfart as a backup, we'll have the Bigfart ready for modification.
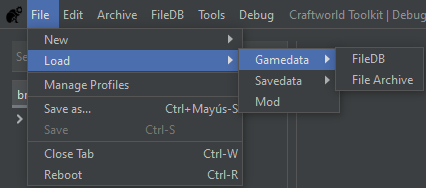
This one will require usage of craftworld toolkit, which we've downloaded before. After you've dumped a copy of your game open Toolkit
In toolkit, go to file > gamedata, feed each of them the required file
After you've loaded both in, in the searchbox, type "sack_boy.mol". You'll find it under a few folders.
Right click it, then Export > Model > glTF 2.0
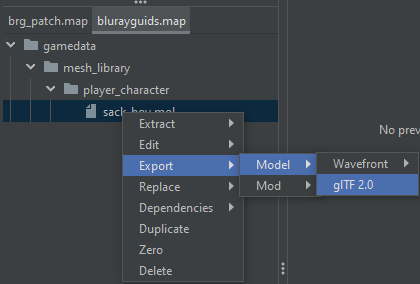
Export this somewhere. This is all you will need from now on
This is the part where we're actually going to create the costume itself. Before this you'll need to make a basis mod, workbench will come with one that works well enough for this (ctbx).
Make a copy of this folder, then on this copy, remove EVERYTHING but the costumes folder, and inside there, all but the "contributors" folder. Finally, remove everything but the "luigi" folder. This will be good enough as a mod basis. Clone the Luigi folder and name it after your model (not obligatory, but makes management easier down the lane)
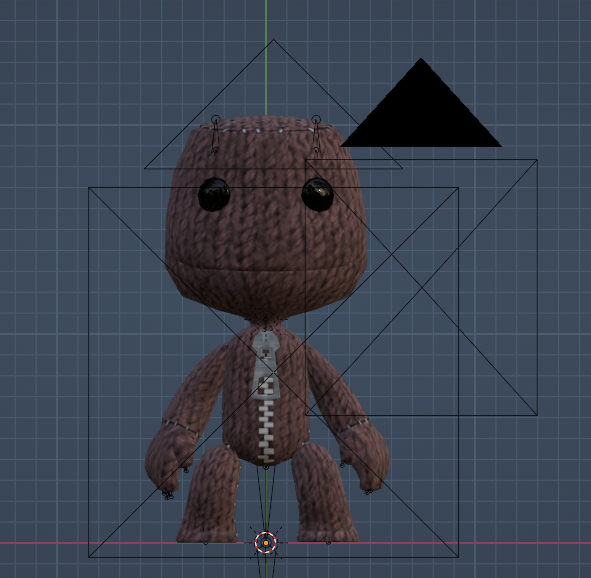
Now, we're going to open Blender and import the sack_boy model we exported a few steps back. Go to Import > gLTF 2.0
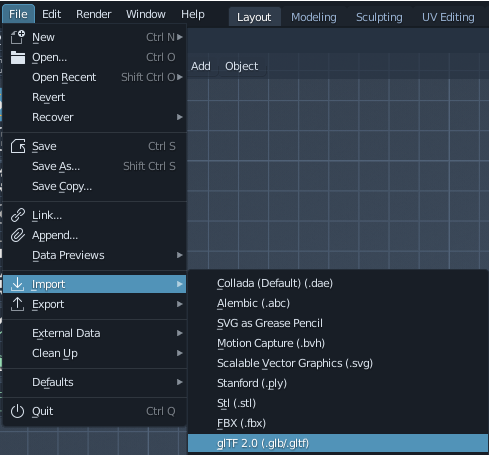
Locate the sack_boy.glb file we obtained before, and then import that. We'll have Sackboy in our viewport now. We need to make a tweak before we begin weighting the model
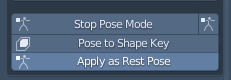
Open the CATS plugin (very right of the viewport), then the button to the right of the "Start Pose Mode" button, then Apply as rest pose. This will make the armature not look weird and overall make positioning our model more predictable
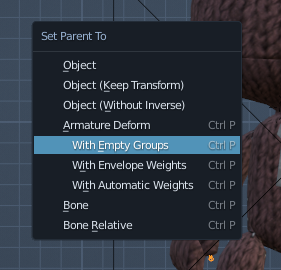
After this, Parent your model to the sack_Boy armature, make sure you select "With Empty Groups", do NOT use automatic weights, as while it might work, it'll require a lot of mantenience after
Once that's done, we simply weight out model accordingly. While i'm not going over the details on how weight painting works, i can offer a few tips
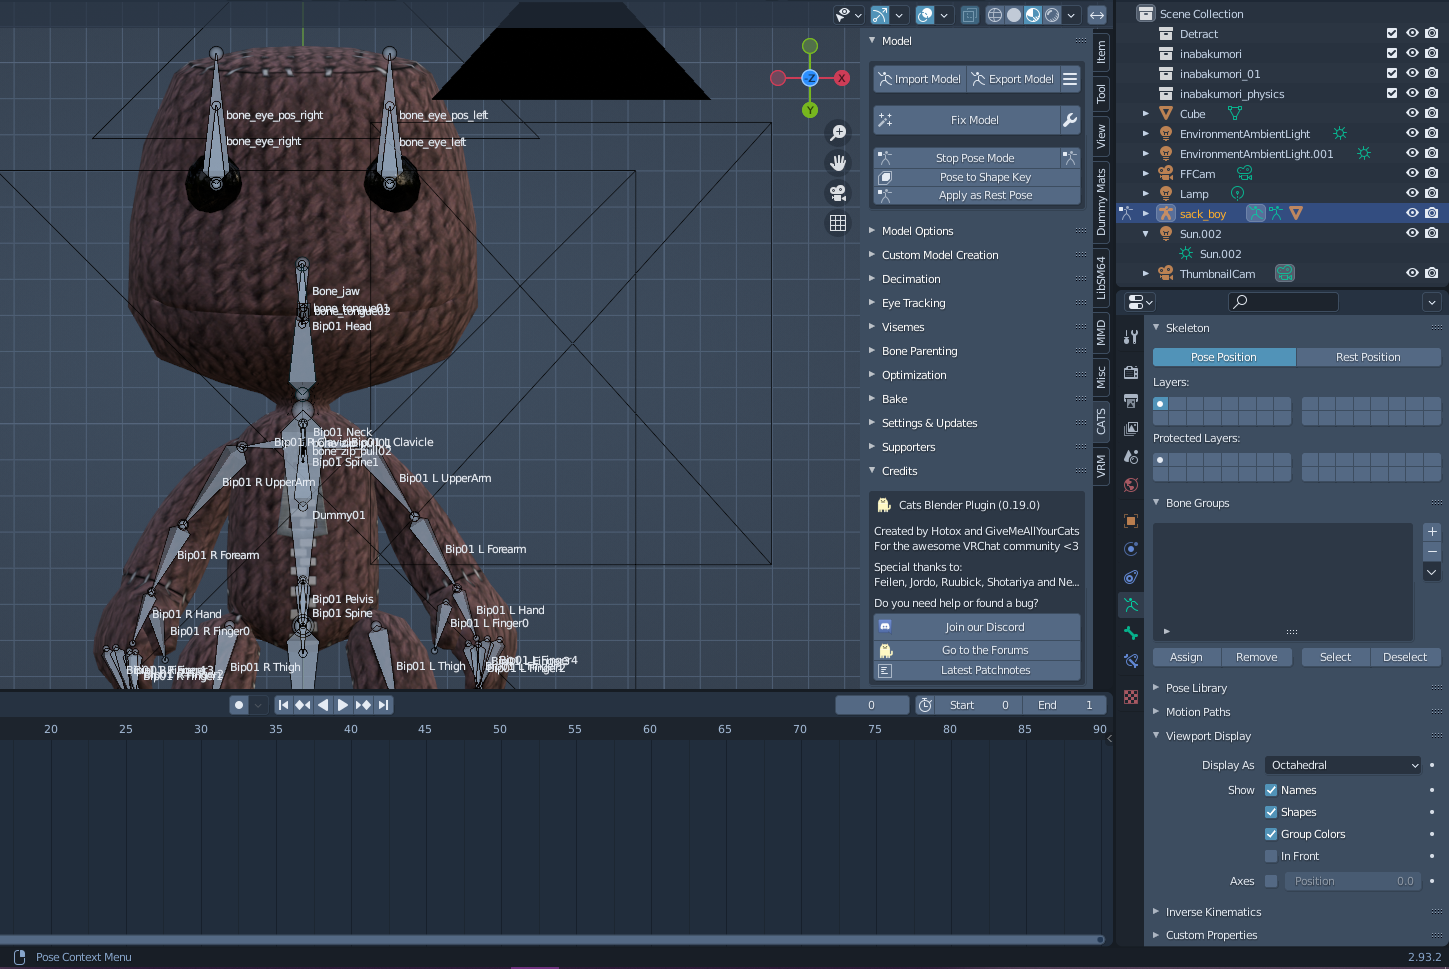
With the model now weighted to the armature properly, delete all meshes associated with the original sackboy
model. as if we don't it'll show up on our exported model. Then, File > Export > gLTF.
Export this model over the cloned folder, if the name shows up as red, then that's an indication it'll
overwrite the file, press export and it'll do so.

Once that's done, you will need a render of the model (which i'll not go into detail on how to do so) which should be about 128px, or even 64px if you really need to save space. This is not obligatory, but it'll make the costume pieces easier to dicern in regards to how they'll look like. Overwrite the icon file like we did the glb file.
With that, almost everything is done, now all we neeed is to configure the json file for the piece to give it proper metadata.
Now we just need to modify the info of our .json file. This will give it the proper name, description, and
other information about the costume piece
When you open it, you should see something like this (with different info)
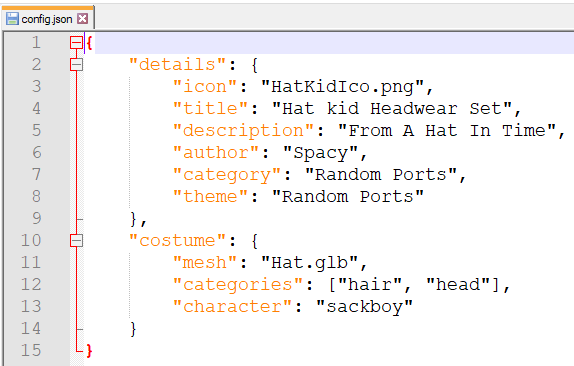
With this, it's for the most part just replacing content with things that fit, there's two exceptions, categories and regions (which you'll have to add yourself)
Categories are simply the parts of sackboy's costume slots that the piece will be apart of. Think of it as Minecraft armor, only that certain armor pieces require more slots than one. If costume piece A takes categories 1 and 2, equipping it will remove any objects in those categories. If you want to equip something in category 2, you have to take Costume piece A off, which the game does for you.
Then there's regions, this simply tells the game to hide any part of sackboy's model, this is usually done if you want to replace the mesh, or it's never seen, allowing you to make it invisible to save on resources
In general you should check out workbench's readme.md file (although keep in mind it's very outdated), it'll show you which categories and regions are available, alongside examlpe .json files for reference.
Here's the part where we start to utilize both workbench and toolkit, first, you'll need to compile your mod
to whichever main-line game you wish to. This is done through the following command
node mod.js --build mod_name platform
Okay, let's explain a few things here. Workbench is a command-line utility, therefore you'll need to go to where workbench is located with a terminal. It's made with node.js, therefore you're required to install it through the command 'npm install', go to the folder and type that. Keep in mind, unless you do any modifications this only needs to be done once.
Once it's installed, lets talk about the command in place. the argument mod_name should be the name of the folder of your mod. and platform what game we want to compile for. it can be lbp1,lbp2,lbp3 or lbp3ps4.
After we write and execute the command, if nothing shows up in output it has most likely gone well, there'll be a folder in our mod's folder called "build", and within one called "dist". This is the mod file that we'll install to our profile
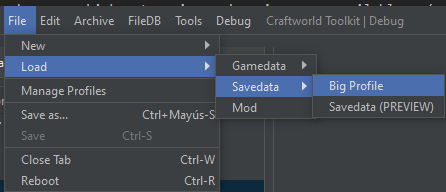
Now we just need to open the bigfart with craftworld, then install the mod, and just send the bigfart to our ps3
To do this, we'll open the bigfart with Craftworld, simply use File > Load > Save Data > Big Profile
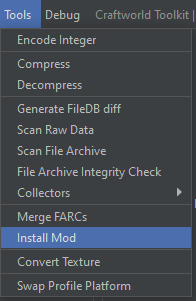
Now, we just go to tool > Install Mod, then we select the mod we just generated.
After all of this, this should be all, we simply send the bigfart to our console through FTP and overwrite it. Then ingame, equip it (at the very bottom) and ensure everything is working correctly.
Fonts courtesy of int10h
Website colored from the palette Rosy42, which is made by PineTreePizza